Contents
Installation
Installation of Inventory Pro involves setting up the SQL Server database, running the installation package for the Desktop application, and optionally enabling the Mobile application and REST API. The public documentation below focuses on the steps an administrator needs to complete safely without exposing internal deployment tooling.
:::tip[Quick Start]
- Database — Restore the
.bakvia SSMS and map the application login. - Desktop — Update
install.xml, runrun.bat→ Option 1. - Mobile (optional) — Run Mobile
run.bat→ Option 1. - Secure — Bind SSL certificate in IIS, log in, change the default admin password. :::
| Component | Access Path | Purpose |
|---|---|---|
| Database Setup | SQL Server Management Studio | Restore the provided backup and create the application login |
| Desktop Application | Installation package | Install the primary web application |
| Mobile Application | Installation package | Install the optional mobile web app |
| REST API (optional) | Separate deployment | Enable programmatic access for integrations |
| Configuration | Installation review | Confirm connectivity, HTTPS, authentication, and email settings |
Prerequisites
Ensure you have local administrative rights on the application server and the required SQL Server credentials before beginning installation.
| Requirement | Minimum Version | Notes |
|---|---|---|
| Windows Server | 2016 or newer | Windows 10/11 supported for development or evaluation |
| SQL Server | 2017 Standard/Express or newer | SQL Server 2019 or newer recommended |
| SQL Server Management Studio | Latest version | Required for database restore and login management |
| Web Browser | Firefox or Chrome | Use a modern browser for setup verification |
| .NET Framework | 4.7.2 or newer | Required by both Desktop and Mobile |
The installation package enables the required Windows and IIS features automatically and installs the supporting runtime components needed by Inventory Pro. No manual IIS configuration is required before running the installer.
Installation Overview
| Step | Component | Time Estimate |
|---|---|---|
| 1 | Database Setup | 15-30 minutes |
| 2 | Desktop Application | 10-15 minutes |
| 3 | Mobile Application (optional) | 5-10 minutes |
| 4 | REST API (optional) | 5-10 minutes |
| 5 | Post-Installation | 10-20 minutes |
Database Setup
The database can be restored manually in SQL Server Management Studio or with guided assistance from CISS.
Manual Setup (SSMS)
1. Extract the backup
Extract the provided .bak file from the installation package.
2. Enable Mixed Mode Authentication
- Open SQL Server Management Studio and connect to your instance.
- Right-click the server name and choose Properties.
- Open the Security page.
- Select SQL Server and Windows Authentication mode.
- Apply the change and restart the SQL Server service (this is always required for the change to take effect).
3. Create the application login
Run a script similar to the following in a new query window:
CREATE LOGIN [YourUserName]
WITH PASSWORD = N'YourSecurePassword',
DEFAULT_DATABASE = [master];
:::caution[Security] By default, SQL Server enforces password complexity and expiration policies for SQL logins. Keep these defaults enabled unless your environment has a specific service-account standard that requires otherwise. Where possible, prefer Windows Authentication over SQL authentication for stronger credential management. :::
4. Restore the database
- Right-click Databases and choose Restore Database.
- Select Device and browse to the extracted backup file.
- Name the restored database according to the guidance in your CISS installation package.
5. Link the database user
After restore, map the orphaned database user to your new login:
USE [YourDatabaseName];
ALTER USER [YourUserName] WITH LOGIN = [YourUserName];
Note: The application login requires
db_owneron the application database. Do not grantsysadminor server-level permissions beyond what is needed for this single database.
Assisted or automated setup
Some installation packages include CISS-managed automation for SQL Server Express setup and validation. Those support tools are not published on the public website. If you need an automated installation workflow, contact CISS Support for the package appropriate to your environment.
Remote database server
If SQL Server runs on a separate server:
- Configure SQL Server to listen on a non-default port and disable the SQL Server Browser service. Using a non-standard port reduces exposure to automated scanning.
- Open only the chosen SQL port from the application server to the database server — do not allow broad inbound access.
- Verify connectivity with
Test-NetConnection -ComputerName <sql-server> -Port <your-port>from the application server before running the installer. - Record the chosen port in your installation notes; the installer will ask for it during database configuration.
Desktop Application
Installer configuration
Before running the installer, review the install.xml file in the installation package. Typical values include an installation root, the Desktop folder name, the primary site URL, HTTPS preference, authentication options, the SQL Server host, and the restored database name.
:::caution[Security] After a successful installation, secure or remove install.xml from the server. It contains the database server name and configuration details that should not remain in an accessible location on a production system. :::
Example structure:
<?xml version="1.0" encoding="utf-8"?>
<Configuration>
<root>[InstallDrive]:\InventoryPro</root>
<installFolder>Desktop</installFolder>
<domainName>inventorypro.example.com</domainName>
<siteName>Default Web Site</siteName>
<requireSSL>true</requireSSL>
<enableActiveDirectory>false</enableActiveDirectory>
<enableEmail>false</enableEmail>
<databaseServer>your-sql-server</databaseServer>
<databaseName>your_inventorypro_database</databaseName>
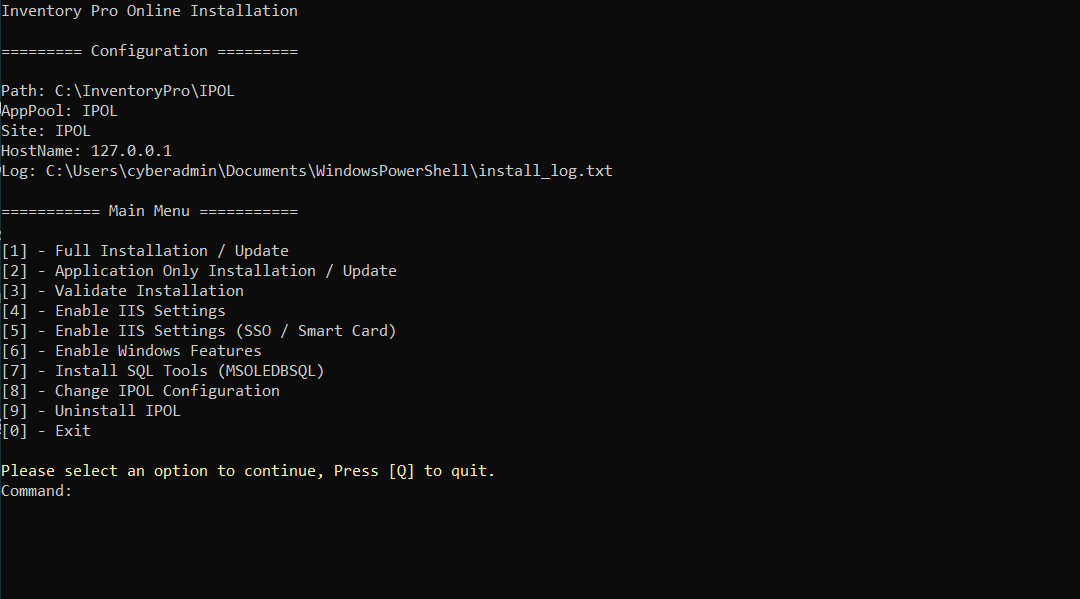
</Configuration>Run the installer
- Extract the installation package.
- Open the extracted folder and run
run.bat. - Select the appropriate menu option.
:::caution[Backup Before Upgrading] Always take a full database backup before running an update (Option 2). Use SQL Server Management Studio or your scheduled backup process to create a .bak file you can restore if the upgrade encounters issues. :::
| Option | Action | When to Use |
|---|---|---|
| 1 | Install / Reinstall | Initial installation or full reinstall |
| 2 | Update | Apply updates without reconfiguring IIS |
| 3 | Validate | Check configuration and diagnose issues |
| 4 | Enable IIS Settings | Reconfigure IIS settings only |
| 5 | Enable IIS Settings (SSO) | Configure for smart card or SSO environments |
| 6 | Enable Windows Features | Install required Windows features only |
| 7 | Install Tools | Install supporting drivers and IIS modules only |
| 9 | Uninstall | Remove the Inventory Pro installation |
For a first-time deployment, run Option 1 and then review the validation results.
IIS Application Pool notes
The installer configures the required application pools automatically. If you need to reconfigure them manually:
| Component | .NET CLR Version | Enable 32-Bit | Pipeline Mode |
|---|---|---|---|
| Desktop (Classic ASP) | No Managed Code | Yes | Classic |
| Mobile (ASP.NET) | v4.0 | No | Integrated |
| REST API (ASP.NET) | v4.0 | No | Integrated |
Unattended installation
The installation package also supports unattended execution for staged deployments, but the automation entry points depend on the package provided for your environment. Use the guidance supplied with your installation package for unattended rollouts.
Dual instance support
To run two instances on the same server, create a second configuration file in the installation root with a different install folder, site name, and database target.
Installation validation
After installation, the validator checks the installation path, required registrations, application startup state, and general connectivity.
Mobile Application
The Mobile application is installed after the Desktop application and shares the same Inventory Pro site.
Install
- Extract the Mobile installation package.
- Run
run.batand select the install option. - Wait for setup to complete.
The installer places the Mobile application inside the Inventory Pro installation and configures the IIS application settings needed to run it.
Mobile configuration
Review the Mobile application’s configuration after installation and confirm:
- Database connectivity
- HTTPS enforcement
- Page sizing and scanner behavior
- Session and login rules required by your environment
The installer manages the connection string key automatically. Do not rename configuration keys manually after deployment.
REST API
The REST API is an optional component that enables programmatic access for third-party integrations, reporting tools, and automation scripts. It is deployed as a separate IIS application alongside the Desktop site.
The REST API is not included by default — contact CISS to enable it for your installation. For details on endpoints, authentication, and usage, see REST API Documentation.
Configuration
After installation, review the application configuration and confirm the items required for your environment:
- Database connection settings
- Primary site URL and HTTPS enforcement
- Authentication method
- Session and password policy
- Email delivery settings
- Export or document-processing folders
Upgrading? If your existing SQL connection settings still reference
sqloledborsqloledb.1, update them tomsoledbsqlduring the upgrade review.
Post-Installation
SSL certificate setup
If your organization does not already manage certificates centrally, install a certificate for the site before enabling production access.
- Configure DNS for the production hostname.
- Install the certificate in IIS.
- Add the HTTPS binding to the site.
- Confirm that HTTPS is enforced in the application configuration.
Verify installation
After installation:
- Open the Desktop site URL configured during installation.
- Log in with the initial administrator credentials. On a fresh installation, these are set during the database provisioning step and supplied in your installation package documentation. If you restored from a CISS-provided backup, the default administrator account and temporary password are included in the package readme.
- Change the administrator password immediately.
- Review the core system settings before users begin transacting.
Note: The Database Setup, Desktop Application, and Configuration sections above are installation-time steps. The checklist below can be reviewed again later on a running system.
Initial configuration checklist
| Task | Location | Priority |
|---|---|---|
| Change admin password | System → Accounts → Change Password | Critical |
| Configure warehouses | Inventory → Warehouses | High |
| Set up locations | Inventory → Locations | High |
| Add users | System → Accounts → System Users | High |
| Configure security groups | System → Accounts → System Groups | High |
| Review Admin Options | System → Configuration → Admin Options | Medium |
| Configure email | Email settings | Medium |
| Confirm backups | SQL Server | High |
Additional configuration
| Task | Documentation |
|---|---|
| Active Directory / SSO | SSO Configuration |
| User Management | User Management |
| Security Groups | Group Management |
| Admin Options | Admin Options |
| Email Alerts | Alerts & Notifications |
Deployment
Desktop, Mobile, and Database deployment automation is handled through internal CISS operations tooling and is not published on the public website. If you need a deployment package for a sandbox, staging, or production environment, contact CISS Support.
Troubleshooting
Common issues
Connection errors or missing provider
- Confirm the SQL driver installation completed successfully.
- Verify the SQL Server is reachable from the application server.
- Review the configured connection settings.
Application registration issues
- Re-run the installer or validator.
- Confirm the required IIS settings are enabled.
- Review the validation output for any missing components.
Site will not start
- Check for hostname or binding conflicts in IIS.
- Confirm the chosen site URL resolves to the correct server.
- Review firewall and certificate configuration.
Document or export issues
- Restart IIS if a service restart is required.
- Confirm the configured export folder exists and is writable.
- Re-run validation if supporting components appear unavailable.
Session or login problems
- Review session timeout and lockout settings.
- Check IIS application pool idle timeout settings.
- Confirm cookies and HTTPS settings match your environment.
Mobile app connectivity problems
- Confirm the Mobile application was installed successfully.
- Review its connection settings.
- Verify that the certificate and IIS configuration cover the Mobile application path.
Validation
Use the installer’s built-in Validate option after installation or repair work. If validation still reports errors, contact CISS Support with the validation output and the installation log.
Log files
| Log | Location | Contents |
|---|---|---|
| Install Log | Installation folder | Installation steps and errors |
| IIS Logs | IIS log folder | HTTP requests and errors |
| Application Log | Windows Event Viewer | ASP or ASP.NET errors |
| SQL Error Log | SQL Server log folder | Database errors |
Support
For installation assistance, contact CISS with:
- The installation log
- Screenshots of any error messages
- Server OS version and SQL Server version
- Validation output when available
:::tip[Related] Learn about deployment options and security: System Architecture | Pricing & Editions :::
On this page